Guides to Fermenting Vegetables, Recipes for Fermenting Vegetables
A Simple Sauerkraut Recipe for Beginners. Getting Started Fermenting in Jars and Ceramic Crocks.

Jul
Fermented vegetables taste great and are so easy to make. Some vegetables, a little salt, and few other bits and pieces from your kitchen are all that are needed. Our simple sauerkraut recipe for beginners will walk you through all the stages of making this traditional and nutritious fermented cabbage.
Although the recipe itself is super simple, this is going to be quite a long post. Along with the recipe, I will go over some fundamentals of the fermentation process, offer some tips on what equipment to use, and describe how to store your finished sauerkraut.
A Brief Introduction to Lacto-Fermentation
During the process of Lacto-fermentation, the friendly bacteria Lactobacillus converts naturally occurring sugars found in foods into lactic acid. This lactic acid both preserves and flavours the resulting ferment.
Lactobacillus is so useful for preserving as it thrives in and creates conditions that are hostile to many other microbes. Some of these microbes would otherwise be harmful to us or would spoil the ferment. These conditions include:
- Lactobacillus tolerates and flourishes in high concentrations of salt.
- Lacto-fermentation occurs in an anaerobic environment, one that that is depleted in oxygen.
- The lactic acid produced by Lactobacillus during lacto-fermentation creates an increasingly acidic environment.
So when we ferment vegetables our 3 principal goals should be to:
- Create the ideal salty environment for Lactobacillus to live and multiply in.
- Keep air, and therefore oxygen, out of our ferment as much as possible.
- Ensure that Lactobacillus grows rapidly in the ferment, producing lots of lactic acid.
Finally, during lacto-fermentation Lactobacillus produces carbon dioxide gas as a waste product. This needs to be able to escape from the ferment.
Simple Sauerkraut Recipe Ingredients
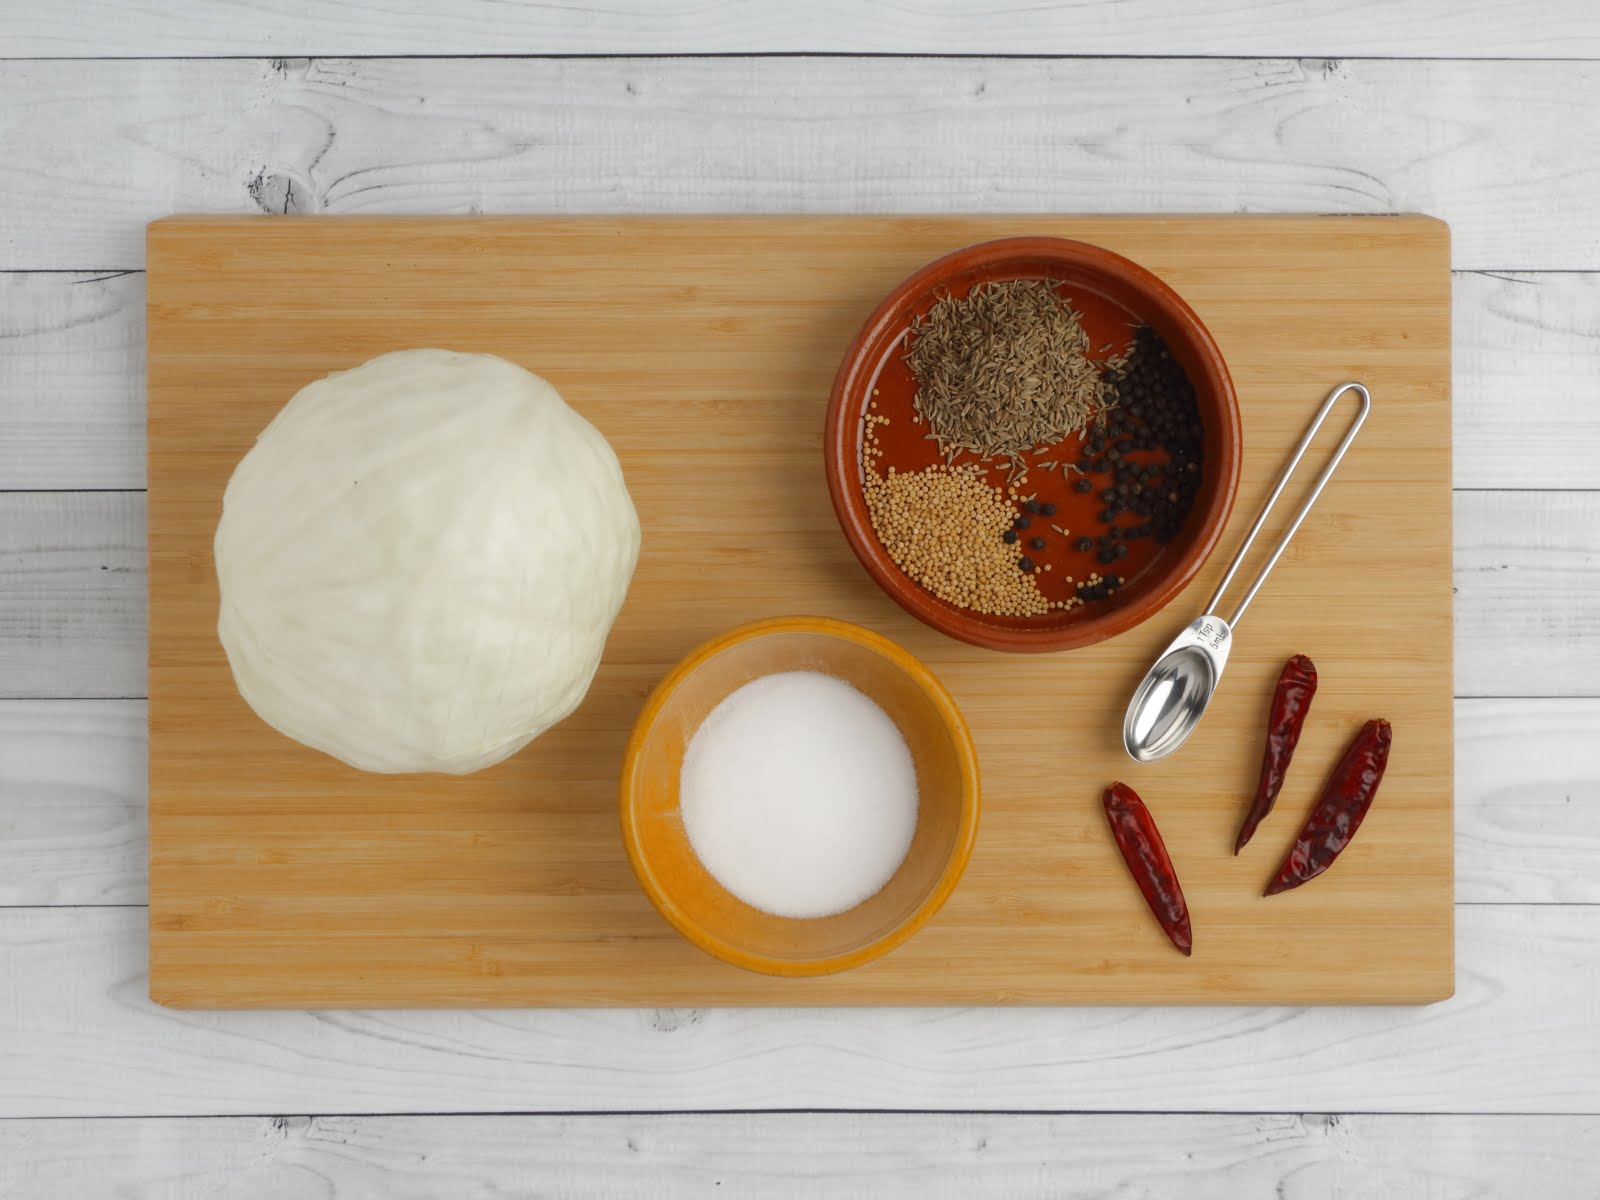
Sauerkraut, at its most basic, is made from just cabbage and salt. Adding a spattering of spices to our simple sauerkraut recipe will liven up the flavour. Any cabbage can be used, the crunchy varieties of tight-headed white or green summer cabbage being most suitable. As a general rule 1kg of shredded cabbage will make around 1 litre of sauerkraut. Table salt often contains additives hostile to the fermenting process so I recommend using fine sea salt.
Fortunately Lacbacillus is already present on the surface of your vegetables, there is no need to add any to get the ferment started..
To make around 2 litres of sauerkraut:
- 2kg of shredded cabbage. Approximately 2 large white or green summer cabbages.
- 40g fine sea salt.
After some experimenting you will undoubtedly find your own favourite combination of spices. Juniper berries and caraway seeds feature heavily in traditional sauerkraut making, but they are definitely an acquired taste. Instead, I highly recommend this hot sauerkraut spice mix that we often make here at home. Vary the quantity of chilli according to your tastes, or alternatively just leave it out.
- 2 tsp cumin seed.
- 2 tsp hot chilli flakes (optional).
- 1 tsp white mustard seed.
- 1 tsp black pepper corns.
Simple Sauerkraut Recipe Equipment Needed
You do not actually need any specialist kitchenware to make this simple sauerkraut recipe. It is very likely you already have everything required at hand in your kitchen.
- Large, non-metallic mixing bowl.
- Sharp vegetable knife or a mandoline slicer.
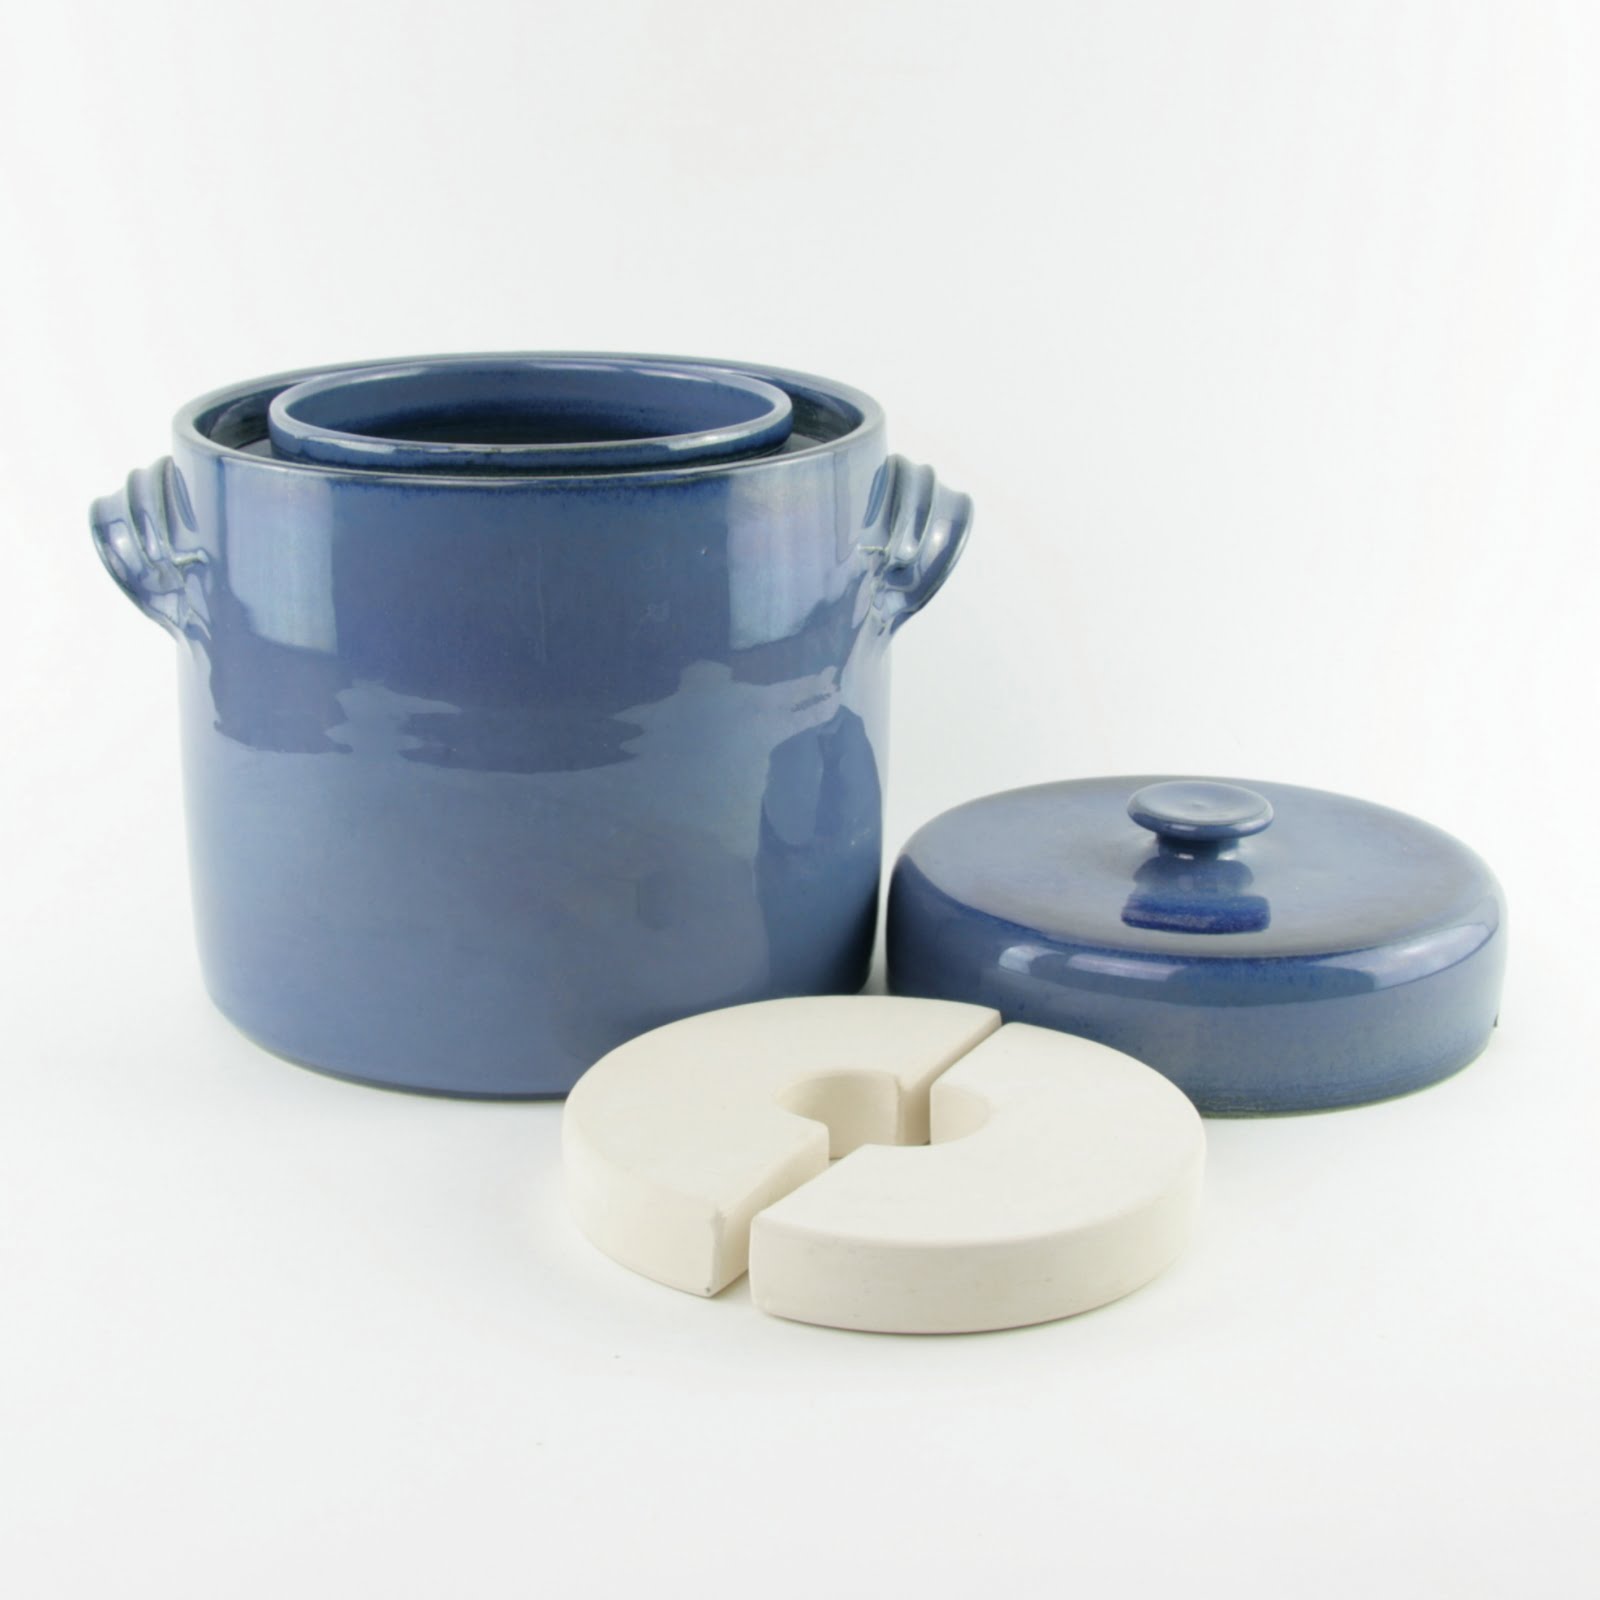
- Glass jars with lids or a ceramic fermentation crock.
- A wooden spoon, flat-ended rolling pin or cabbage pounder.
- Large pebbles or purpose built fermentation weights.
Choosing to Use Jars or Ceramic Crocks

Fermentation of the prepared cabbage can take place in a range of containers. Glass jars or ceramic crocks are most commonly used. Each have their pros and cons. Jars are handy for beginners, or for old hands preparing smaller batches of ferments, while crocks are most useful for the preparation of larger quantities of kraut. The basic principal behind all these different fermentation vessels is to keep oxygen rich air out, while at the same time allowing the carbon dioxide produced by the fermentation process to be released.
Sealed Jars
With sealed jars this is achieved by periodically cracking the jar lids open to release the pressure. This process is somewhat humorously known as ‘burping’. The best part about using jars is that you don’t have to decant your finished ferment for storage, the contents can stay in the same jar from the start of the fermenting process until it is time to serve.
Any jars will do, as long as they have well fitting lids. Kilner’s clip-top jars are ideal. They have a wide opening for easy filling and the wire lever mechanisms make the jars simple to burp. Even if you forget to burp them the seals will eventually release the increasing gas pressure long before the jar explodes.
Ceramic Fermentation Crocks
Ceramic crocks have been used to ferment vegetables for centuries. It is a simple technology that has stood the test of time. The lids of ceramic fermentation crocks sit in a water-filled trough. As pressure rises inside the crock this simple water-trap allows carbon dioxide to escape while also preventing the ingress of air from outside. Being very easy to fill with larger quantities of vegetables, and able to be left for long periods without attention, makes them an essential accessory for anyone serious about fermenting. After your ferment is ready it is decanted into multiple jars for storage in your fridge.
Fermentation Jars with Airlocks or Valves
The water-filled brewing airlocks, like that found on our airlock fermentation jar sets, work in a similar way to the water traps found on ceramic fermentation crocks. These jars never need to be burped, but like ceramic fermentation crocks it is necessary to decant the finished product into other jars for storage.
Kilner’s fermentation jar sets features 2 types of lids. The first contains a simple one-way valve that only allow for gases to escape from the jars when fermenting. These are then swapped for a conventional lid when fermentation is finished, allowing the jars to be used for storage and serving.
Methods for Weighing Down the Ferment
While fermenting the aim is to keep the cabbage under the liquid brine, this further protects it from oxygen in the air. To do this we weigh the ferment down. Traditionally this is achieved with ceramic or glass fermentation weight stones, but when fermenting in jars we can also use stones or pebbles.
Simple Sauerkraut Recipe Method
Preparing the Cabbage
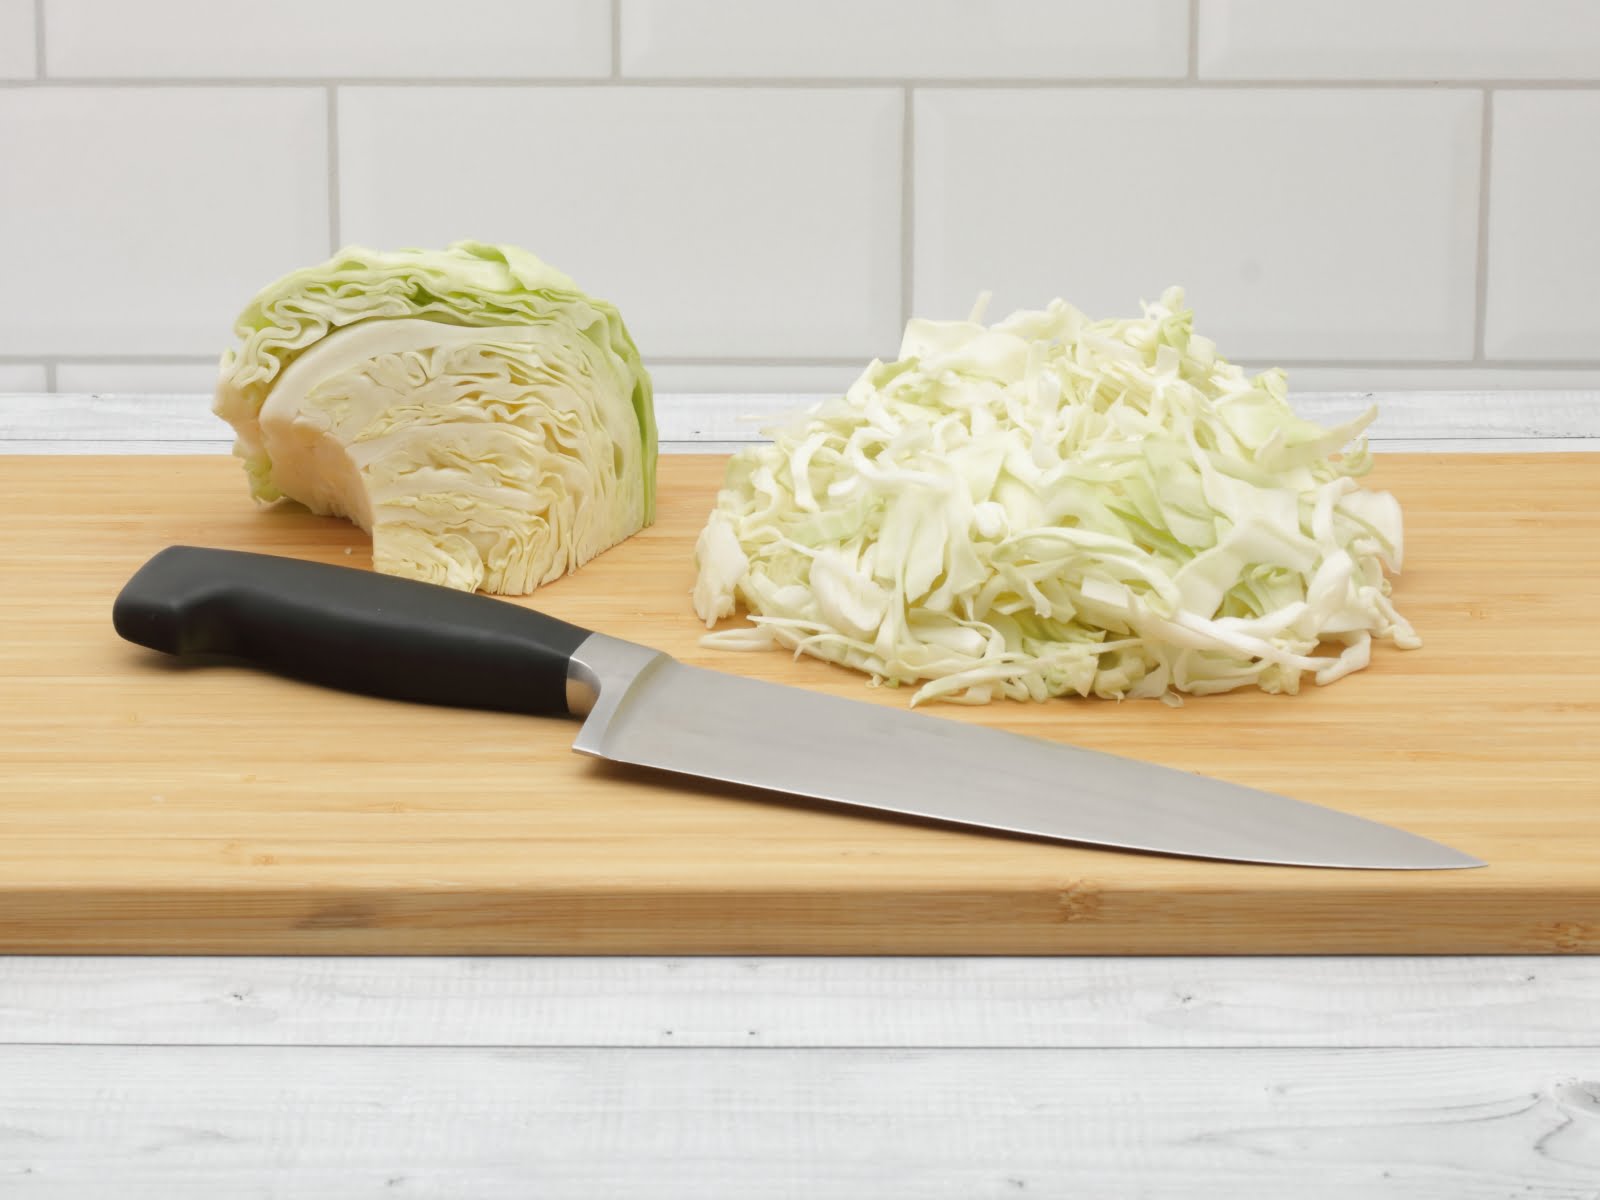

Having gathered together your equipment and ingredients, the next stage of our simple sauerkraut recipe is to prepare the cabbage. The aim is to shred the cabbage by cutting it into long, fine strips. This can be achieved with either a sharp knife or a mandoline slicer.
Discard any limp or discoloured outer leaves. You may wish to set aside some clean outer leaves to use in keeping the sauerkraut beneath the brine, more about that later.
Shredding Cabbages with a Knife
Using a sharp kitchen knife cut your cabbage into quarters. This will reveal the hard core of the cabbage. Cut the core from each quarter section and discard it. Now weigh your cabbage quarters, we will need the weight to determine how much salt to use. Hold the quarters of cabbage down on a flat side and slice them laterally into thin strips.
Shredding Cabbages with a Mandoline
Mandolines make fast, accurate work of shredding larger quantities of cabbage. Be careful if using one though as they can be dangerous. Quarter your cabbages with a knife first and weigh them. Keep the unwanted core in place and shred the rest of the cabbage around it. Do not let your fingers approach the razor sharp blades. If your mandoline was supplied with a vegetable holder use it. Alternatively grip the cabbage with a folded tea towel and/or wear cut resistant gloves. Finish off small pieces of cabbage with a knife. Finally weigh the discarded cabbage cores and deduct from the weight of the quarters, we will need the weight of shredded cabbage to determine how much salt to use.
Salting the Shredded Cabbage


The next stage of our simple sauerkraut recipe is known as dry brining where we add the salt to the shredded cabbage. Sauerkraut is usually 1.5% to 2.5% salt by weight, for this recipe we will use 2% salt. It is important to get this ratio of salt to cabbage right, creating the ideal conditions for our Lactobacillus. To calculate the weight of salt needed simply multiply the weight of shredded cabbage in grams by 0.02. So for 2kg or 2000g of shredded cabbage we will need 2000 x 0.02 = 40g of salt.
Place the shredded cabbage in a large non-metalic bowl or food safe container. Gradually add the salt while mixing the cabbage then cover and leave to stand for an hour or so. When you come back to it you will see that the cabbage has started to loose its water through the process of osmosis. Now is the time to start massaging and squeezing the cabbage with both hands. Work the cabbage with you hands for at least 30 minutes in total until you have a good puddle of brine in the bottom of your bowl. This can be hard graft but it can be achieved in stages, leaving the cabbage to rest in between sessions.
Packing the Cabbage into Jars or Crock

Cleaning the Fermentation Jars or Crock
Whether glass or ceramic your fermentation vessels will need to be cleaned well with warm, soapy water. There is no need to sterilise them in an oven. If you are using fermentation weights or stones sanitise them by simmering in a 50:50 white vinegar and water solution for 30 minutes.
Packing and Pounding
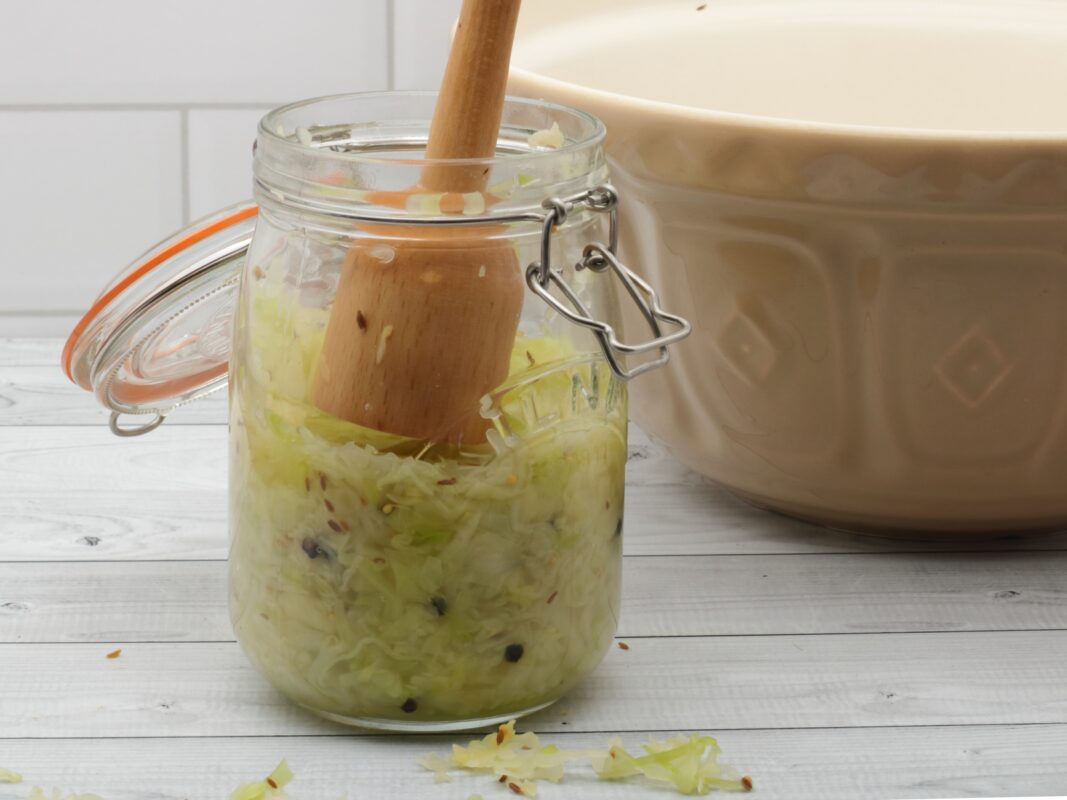
Pack your cabbage into your jar or crock a little at a time. Each layer you add needs to be pounded to pack it down and further squeeze out the brine. You can do this with the flat end of a rolling pin, the edge of a wooden spoon or with a purpose made cabbage pounder. You don’t actually pound the cabbage, this would risk breaking your crock or jars, just press the pounding implement firmly down repeatedly, squeezing more brine from the cabbage. Add any spices as you fill the container.
When packing bear in mind you will need some headroom at the top of your crock or jar to maneuver your weight stones or pebbles in.
When done pour the remaining brine from your bowl into the jars or crock. The aim is to have the top of the fermenting sauerkraut fully submerged.
Weighing Down the Ferment

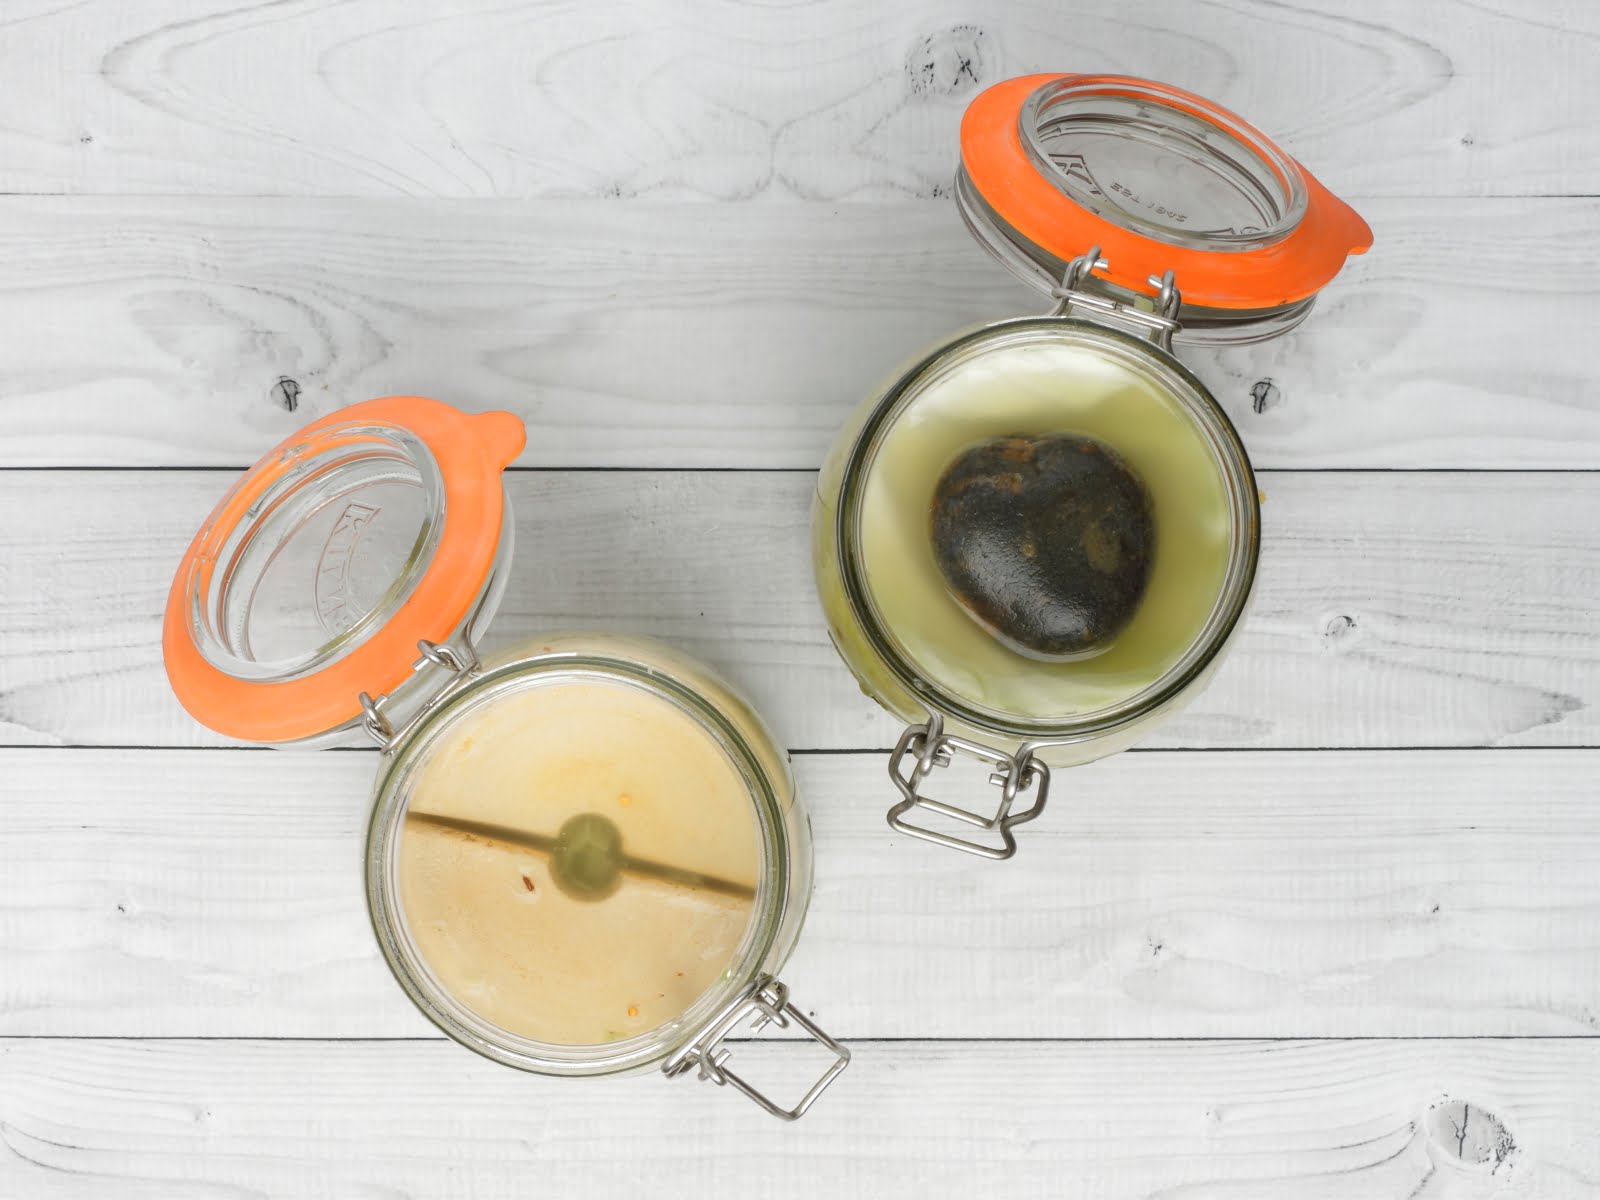
The next step is to weigh down the cabbage to prevent any from floating to the surface of the brine. This can be achieved with a purpose made set of fermentation weights or alternatively a clean stone or pebble. Cut a circle in a cabbage leaf the diameter of your fermenting jar and place it on top of your ferment followed by your stone or pebble. Alternatively a circle of kitchen parchment paper can be used instead.
Not Enough Brine?
It may be that that you do not produce sufficient brine to submerge the ferment. This can happen if the cabbage you were using has gone a little dry prior to shredding. If so make up a 2% salt solution, by mixing 20g salt in 1 litre of water, and top up with as much as you need.
Sealing the Crock or Jar
Once packed and weighed down it’s time to seal your ferment. Close jar lids tightly. If using a crock move it into its final position. Then fill the trough with water having placed the lid on first.
Looking After Your Ferment
The optimal temperature for sauerkraut lacto-fermentation is 18oC to 22oC. Maintaining this range off temperatures is particularly important during the first few days of the ferment. Locate your fermentation jars or crock in your house accordingly. If using jars place them out of direct sunlight.
Initially the fermentation will be slow but will increase over the first week or so until slowing again. If using sealed jars ensure you burp them at the end of day 2, and daily after that until the end of the first week. After that they will only require burping every few days. If using a ceramic crock check the water level regularly and top-up the trough when needed.
Opening your jars or crocks will be necessary to check on the sauerkraut’s progress by tasting or to detect any problem with the ferment. Try to balance this with the risk of contamination by doing so.
How Long to Let Your Sauerkraut Ferment
This is down to a number of factors and is highly subjective depending on the flavour required. Higher ambient temperatures increase the rate of fermentation, but at 18oC to 22oC the sauerkraut should be fully fermented in 21 to 28 days. The longer the ferment the more sour the kraut will be. I prefer a younger kraut, and will finish the ferment at around 7 to 10 days in the summertime . Ideally after the first week start tasting the sauerkraut every few days, when it’s to your taste it’s ready.
Even after a full-length ferment your sauerkraut should maintain a crunchy texture.
Storing Your Sauerkraut
Chilling your kraut will effectively cease any further fermentation. If you are using jars they can go straight into your fridge ready to serve. If using a crock decant the sauerkraut into clean jars first. Stored in your fridge the kraut will be good to eat for up to 6 months but be careful to be on the lookout for spoilage before serving.
Problems During Fermentation
Lacto-fermentation of vegetable is usually pretty trouble free but there are a few microbes that can cause problems in your ferment.
Kahm Yeast
This is a yeast that most often forms at the start of fermentation when acidity is still low. It appears as a powdery white substance on the surface of your ferment. It’s pretty harmless but will taste horrible. If found remove as much as possible, as well as a thick layer of the kraut below it, and repack your fermentation jars or crock. You may prefer to discard the batch and try again.
Bacteria
Bacteria can cause the brine to become slightly glutinous. Again this is usually a problem encountered during the first few days of the ferment, before lactic acid levels have sufficiently risen. It’s not usually a problem with cabbage only sauerkraut, but if you add sugar-rich vegetables like carrots it can be a an issue. It is harmless but will result in the vegetables loosing their crunch. To avoid this ensure that the ferment is kept at 18oC to 22oC for the first few days.
Molds
Molds appear as white, black, green or pink fuzzy growths. Fortunately the appearance of molds is pretty rare. Molds can be dangerous to health and if they appear I would usually recommend discarding the ferment.
